| Version 18 (modified by , 14 years ago) (diff) |
|---|
Rubot Documentation
RuBot was created by Chris Lee to provide a framework in ruby to study different botnets in a safe environment. This page gives an example of how to access and configure that framework for experimentation in DETER. We describe a simple use of RuBot that has been coordinated through SEER. This example is a starting point from which researchers can explore SEER integration and the RuBot package.
A Sample Worm Propagation
Our example is uses one of the RuBot botnets that demonstrates a simple worm propagation which has each bot connect to an IRC server. This code will allow the user to initiate a worm in one node and have to worm propagate to multiple other nodes. The code works by starting a vulnerable server on each node the user wants to infect. If the node being attacked is running a vulnerable server then the attack is successful. Each time a node is compromised it will run a payload and connect to an IRC server to receive commands. All user commands can be given via SEER. The payload and additional IRC commands have to be specified by changing the code.
In order to have this worm run in your experiment through SEER you need to have rubot.tgz installed on each node. Inside of the NS file you need to have:
tb-set-node-tarfiles [set $node] /usr/ /proj/Deter/tarfiles/rubot.tgz
So the RuBot framework will be loaded onto each node. Replace ‘$node’ with the node(s) you want to have RuBot on. The ‘/usr/’ is where RuBot will be unzipped. RuBot needs to be unzipped in the /usr directory.
The next step is copping wormAgent.py into a place where SEER can find it and load it as an attack agent. To do this wormAgent.py needs to be copied from /users/arod/seer_rubot/modules and placed in a directory in either your directory or your projects directory. The directory needs to be set up with three sub directories titled modules, source, scripts. For example /users/arod/seer_rubot which has modules, source, and scripts as subdirectories. Place wormAgent.py in the modules subdirectory. Inside of the NS file place:
tb-set-node-startcmd $node "sudo python /share/seer/v160/experiment-setup.py Basic -d /users/arod/seer_rubot wormAgent"
Replace ‘/users/arod/seer_rubot’ with the path to your seer directory not the path to the wormAgent.py and replace ‘$node’ with each node in your experiment.
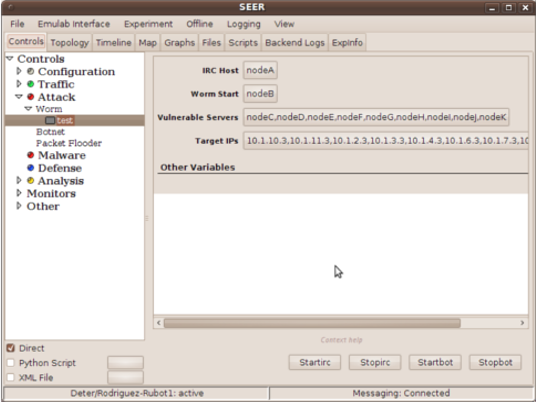
When you start SEER select the 'Worm' agent from the attack menu. The 'IRC Host' variable specifies which node will run the IRC server Make sure each node has a path to the IRC server so they can talk. This worm is started at one node and pointed towards other nodes within the network. The node which starts the worm is specified by the 'Worm Start' variable. This node needs to be different from the IRC server. The worm does not penetrate any defenses, but will successfully defeat a node if the node has a vulnerable server running on it (vulnserv.rb). Select the nodes you want to become vulnerable in the 'Vulnerable Servers' variable. The worm will branch out from the 'Worm Start' node and will attack the IP addresses you specify in the 'Target IPs' variable.
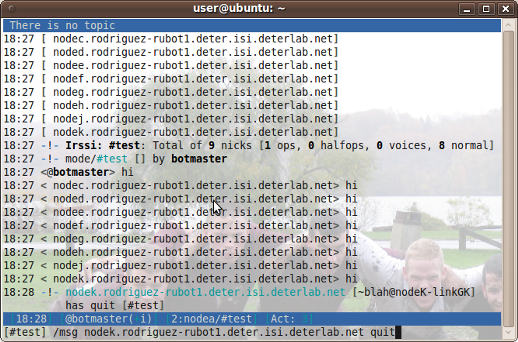
Once the vulnerable node has been 'attacked' by the worm it will run a series of commands embedded in vulnserv.rb. These commands are running the payload, initiating communication with an IRC server, and attacking the next level of IP addresses. The current payload is a get call to a website. The communication between the bots and the IRC server is limited. The bots will accept commands only from the nick 'botmaster.' The only commands they respond to are 'hi' and 'quit.' For 'hi' each bot will respond with 'hi' and for 'quit' each bot will leave the IRC server and stop running vulnserv.rb. Commands can be given either in the open or as PRIVMSGs. More commands can be programed by altering vulnserv.rb.
Once the variables have been set, STARTIRC will start the IRC server and STARTBOT will begin the propagation of the worm. You can monitor the status of the bots logging onto the IRC server by joining the IRC server on channel #test.
SEER Integration Details
In order to create a SEER Agent you have to create an agent file. The name of the file follows the format agentNameOfTheAgent.py where the NameOfTheAgent is in caps. For example agentWORM.py or agentBOTNET.py.
The agent code has some specific requirements (you can see these in the example agentWORM.py). The agent is defined in a class 'class wormAgent(Agent)' that is derived from SEER's Agent class. Inside of the class there are seven class variables which need to be defined:
- DEPENDS
- SOFTWARE
- AGENTGROUP
- AGENTTYPE
- NICENAME
- COMMANDS
- VARIABLES
DEPENDS specifies additional modules to load during startup. SOFTWARE specifies any binary software which needs to be loaded onto the nodes. Both of these can be empty lists. AGENTGROUP specifies which menu the agent will be under in SEER (Traffic, Attack, Malware, Defense, or Analysis). The AGENTTYPE is the type of Traffic, Attack, etc. the agent is (HTTP, TCP, worm, botnet...). The NICENAME is what is displayed under the AGENTGROUP (Worm, Botnet, Ping...). The COMMANDS class variable is where the commands available to the user are placed. The commands are just listed here to be defined later and need to be in all caps. For the VARIABLES you need to define five parts for each variable. The format is TypeOfVariable('NameOfVariable', DefaultValue, 'GUIDisplayName', 'ExpinationOfTheVariable'). For example NodeVar('IRCHost', None,g 'IRC Host', 'Select the node to run the IRC server'). A list of variable types can be found on the SEER Agents page.
To extend the basic agent class you need to call the 'Agent__init__' method. This will enable you to implement the commands you created. For each command you need to create a definition 'def handleCOMMAND(self):' where command is the name of your command. To have code run on a node if the code is already installed you can use 'self.pids.append(spawn('CommandLineCode'))' If you want to only run code on a node the user selects as a variable then you can use the function 'self.VariableName.myNodeMemberOf()' which will return True if the node is in VariableName.
Next Steps
There are two paths to expand this work. One is to explore the RuBot worm more and the other is to explore the other botnets modeled in RuBot. Some places to expand the simple worm are
- changing the payload delivered by the worm
- adding commands given by the IRC server
- added a success rate to the worm propagation
- or specifying which node attacks each IP address.
The second path has many more possibilities. RuBot has code for several more complicated botnet than a simple worm. It contains a simulated Storm, Nugache, and UDP botnet code as well. Any of these other models would be interesting to look at and incorporate into the Deter testbed.
Attachments (3)
- Screenshot-SEER.png (86.2 KB) - added by 14 years ago.
- Screenshot-irssi.png (291.1 KB) - added by 14 years ago.
- agentWORM.py (2.1 KB) - added by 14 years ago.
Download all attachments as: .zip


